I had a ton of mason jars around my house and wanted to find a creative way to use them. I decided to hand paint tumblers... But when I say "hand paint," I really mean finger paint because who didn't enjoy finger painting as a child? This craft is extremely simple for the children's portion as all they need to do is finger paint a design on the glass. I chose polka dots for simplicity but other designs may be used as well.
Regardless of the design, be sure to cover over your workspace! Acrylics can be difficult to remove.
I plan to use my tumbler as a drinking glass when I go back to school (it is perfectly safe after the final step!), however they can also be used when eating outdoors to put place settings in, as a gift jar for mother's/father's day or a teachers (filled with candy), or even to organize your child's desk.
Materials:
- table cover/newspaper over your workspace
- acrylic paints
- paint dish or disposable plate
- mason jar or other clear glass jar (from the dollar store or a home goods store)
Steps:
1.) Remove all labels completely. Completely clean and dry the jar.
2.) Pour paints onto dish/plate - try not to mis the colors until they go onto the glass.
3.) Dip the tips of fingers into the paint and paint onto the jar. TIP: if you plan to decorate the bottom of the glass turn the glass upside-down before you begin to paint OR put your hand into the glass to paint. Use caution removing the glass from your hand if you choose to paint it this way.
4.) Allow to dry completely.
5.) ADULTS ONLY: Place the dry jar into a cool oven, close the oven and bake at 300°F for 30 minutes. This wil make the tumbler safe to use as a drinking glass as well. IMPORTANT: allow the oven and the jar to cool completely before you remove the jar fromo the oven. Sudden exposure to a much cooler temperature will cause the glass to crack.
Welcome to everyone who questions some fun things to do with kids! This site is dedicated to getting kids to work with their hands to create something. Many of the crafts on this site involve little adult involvement but, stick around while the little ones craft and let out your creative side too!
Thursday, May 30, 2013
Wednesday, May 29, 2013
Kids Craft #2: Corkboard Coasters
These corkboard coasters are a great way to show children that they can make things that will be useful around the house - just like their parents! These make wonderful gifts at the end of the school year if sets of four are wrapped with a ribbon and presented to the child's teacher. They can be themed for holidays or sports or whatever the child desires!
I made the ones on the left using painter's tape for the ones with straight edges, painted sports designs on three, a fishbowl, a sky and whatever designs came to mind.
Materials:
- sheet of corkboard (found at Walmart, Target and craft stores)
- scissor/box cutter (only adults should use these in this specific craft)
- Mod Podge (can be found at Michael's or other craft stores)
- acrylic paint
- paint brushes/sponge brushes
- wide mouthed cup/glass to trace
- Sharpie pen
- hair dyrer (optional)
- painter's tape (optional)
Steps:
1.) Trace the mouth of the wide-mouthed glass onto the cork board with a Sharpie. TIP: the closer you trace the mouth, the more coasters you will have at the end.
2.) An adult must cut around each of the circles with either a box cutter or a scissor. CAUTION: this can become very messy so cut over a garbage or over a covered surface.
3.) Paint Mod Podge over the tops, bottoms and sides of each cork circle. Allow to dry between sides (this can be sped up by drying the sides with a hair dryer). IMPORTANT: wash brushes immediately after use as the Mod Podge will ruin your brushes if they dry with it on them.
4.) Paint away! (if you desire you may use painters tape to add straight-edged designs).
5.) Allow your coasters to dry overnight. Paint again with Mod Podge and allow to dry. Your coasters are now ready for use! Enjoy your child's creations!
Tuesday, May 28, 2013
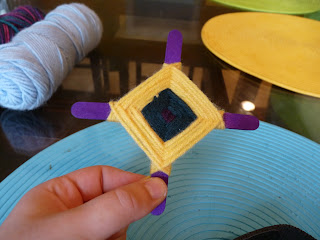
Kids Craft #1: "God's Eye"
The "God's Eye" (or Ojo de Dios as it was originally known) craft can be dated back to ancient Mexico. It was intended to look over others and to bring good luck.
Materials:
- scissors
- yarn (variety of colors)
- small twigs/popsicle sticks
- a hot glue gun and hot glue sticks (an adult
must do these steps!)
Steps:
3.) Rotating the sticks clockwise, spin the long end of the yarn across the center of the sticks and then around the back of each end of the stick.
4.) Repeat step 3 until you want to change the color of your yarn. To change the colors, double knot the ends of two different color strings. Snip the short end of the yarn until about 2 centimeters are left. From here, you may again continue step 3.
5.) When you are ready to end your project, place a small dot of hot glue onto the back end of the stick and weave until the string lands on top of the glue.
6.) When the glue is dry, cut the end of the yarn as close to the glued spot as possible.
Materials:
- scissors
- yarn (variety of colors)
- small twigs/popsicle sticks
- a hot glue gun and hot glue sticks (an adult
must do these steps!)
Steps:
1.) Place a small dot of hot glue in the center of one of the sticks. Place the center of the second stick directly onto the spot of glue in the form of a cross (or a plus sign).
3.) Rotating the sticks clockwise, spin the long end of the yarn across the center of the sticks and then around the back of each end of the stick.
4.) Repeat step 3 until you want to change the color of your yarn. To change the colors, double knot the ends of two different color strings. Snip the short end of the yarn until about 2 centimeters are left. From here, you may again continue step 3.
5.) When you are ready to end your project, place a small dot of hot glue onto the back end of the stick and weave until the string lands on top of the glue.
6.) When the glue is dry, cut the end of the yarn as close to the glued spot as possible.
Subscribe to:
Posts (Atom)